
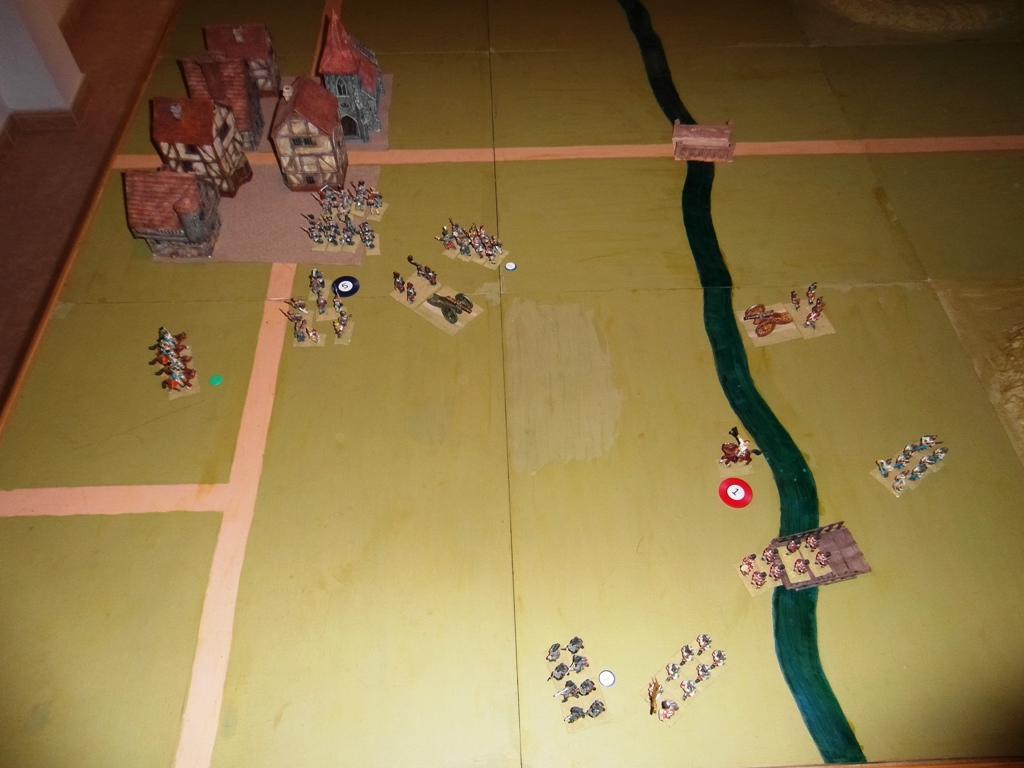
Strasbourg Campaign Area
5th French corps has been
in Strasbourg for 24 hours and has orders to hold the city.
They have 1600 infantry, 100 cavalry
and 30 guns
1st Austrian corps is
ordered to attack the city without first carrying out a full recce.
The Austrians are unaware that the
town is occupied but must carry out the attack anyway
They have 1600 infantry, 100 cavalry
and 30 guns
The river Rhine can only be crossed by
the three bridges

Move 1 – 0800 to 0900
Strasbourg and 5th French
corps are on the left
1st Austrian corps has
entered the table from the right

Move 2 – 0900 to 1000
The French have not deployed until
they see where the Austrians attempt to cross the river
The Austrians are advancing either
side of the main road hide their intention from the French

Move 3 – 1000 to 1100
The French have 12 pounder guns, long
range than the Austrian artillery
They have unlimbered them to cover the
centre bridge
The Austrians are just out of
artillery long range

Move 4 – 1100 to 1200
The Austrians have taken advantage of
the 16” multi move rule to push their cavalry ahead and secure the nearest
bridge. Under this rule a commander can
use his command point s to move one brigade as often as he likes, providing
that they remain out of 16” of the nearest enemy. Their artillery has unlimbered near the
centre bridge to dominate e the ground the French will want to use to react to
the cavalry advance.

Move 5 – 1200 to 1300
French react to Austrian flank attack.
Cuirassiers use 16” move to deploy to
their right flank opposite Austrian hussars
Nearest infantry form square to
protect French right flank
Infantry start to move from left flank
to right flank
Austrian artillery manhandle into long
range of French infantry
Infantry continue to move towards
nearest bridge

Move 6 – 1300 to 1400
French infantry continue to move
towards their right flank
French gunner limber and move to join
them
Austrian infantry approach bridge
Gunners limber and move to support
river crossing

Move 7 – 1400 to 1500
French cuirassiers move forward to
charge Austrian hussars
Austrians charge first and win melee,
forcing cuirassiers to withdraw shaken
French infantry redeploy to cover
proposed river crossing
Austrian infantry reach bridge
Austrian artillery unlimber to cover
crossing

Move 8 – 1500 to 1600
Austrian hussars charge shaken
cuirassiers
French lose the melee and retreat
again, still shaken
Nearest infantry square fire on
hussars but miss
Austrian infantry cross the river
Leading brigade form square until
cavalry melee is decided
Move 9 – 1600 to 1700
Austrian hussars again charge shaken
cuirassiers
This time they kill 10% and the
remainder rout
French corps commander orders general
retreat

Cavalry melee
Wargame Rule 14 covers cavalry combat
The hussars have plus 3 on combat
factors
They need a total of 10 with 2D6 added
to their 3 to rout the cuirassiers
They roll 2x6. Cuirassiers lose 10% casualties and rout
Game Casualties
French has suffered 400 infantry and
100 cavalry casualties
In addition their cavalry brigade had
broken and ran from the field
Austrian have suffered 400 infantry
casualties
Game Summary
A decisive Austrian victory
The French were unlucky to lose this
battle
They had a strong defensive position
behind a river line
But they were very unlucky, they
consistently rolled poor dice
The Austrians were clever to keep the
French guessing which bridge they would attack
They could then reach the chosen
bridge before the French
They needed to win the cavalry melee,
and they did
Had they lost it would have been a
French victory
The French choose to retreat before
the Austrians could cross the river and attack in strength.
No comments:
Post a Comment