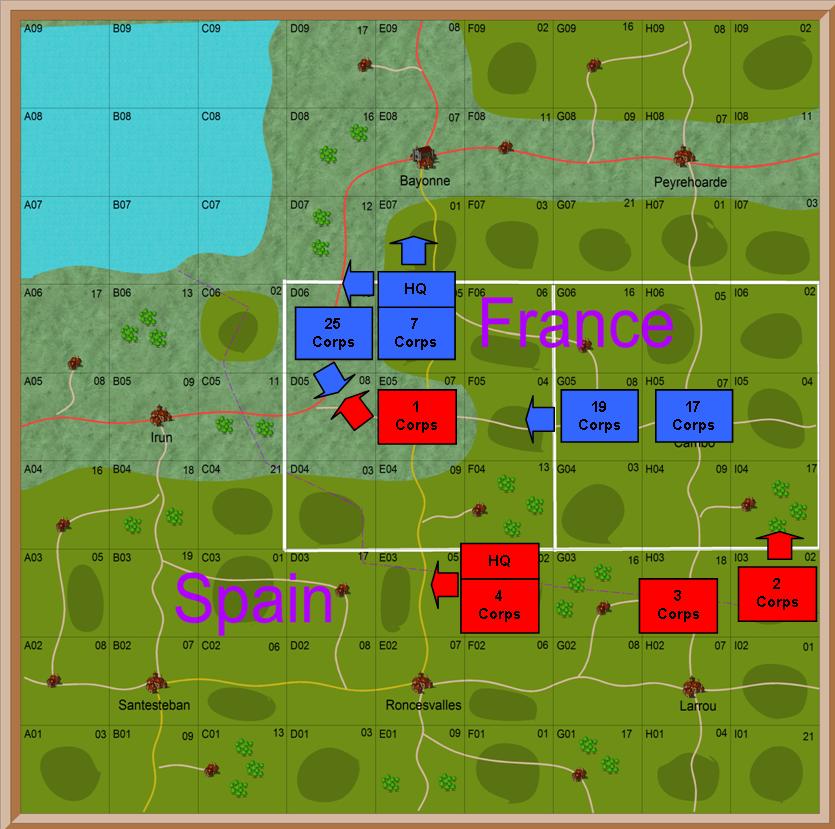
Bayonne Campaign Area
This battle will be fought at the same
time as the battle of Cambo
7th French corps have
orders retreat to Bayonne and avoid the enemy
19th French corps have
orders to attack St Jean
25th French corps have
orders to attack St Jean
1st British corps have
orders to attack 25th French
4th
British corps have orders to move to E03 on attack
French British
46000 infantry 30800 infantry
1800 cavalry 2000 cavalry
90 guns 60 guns
1st British corps have 1200
casualties and one brigade in rout
7th French corps have 2200
casualties and three brigades in rout

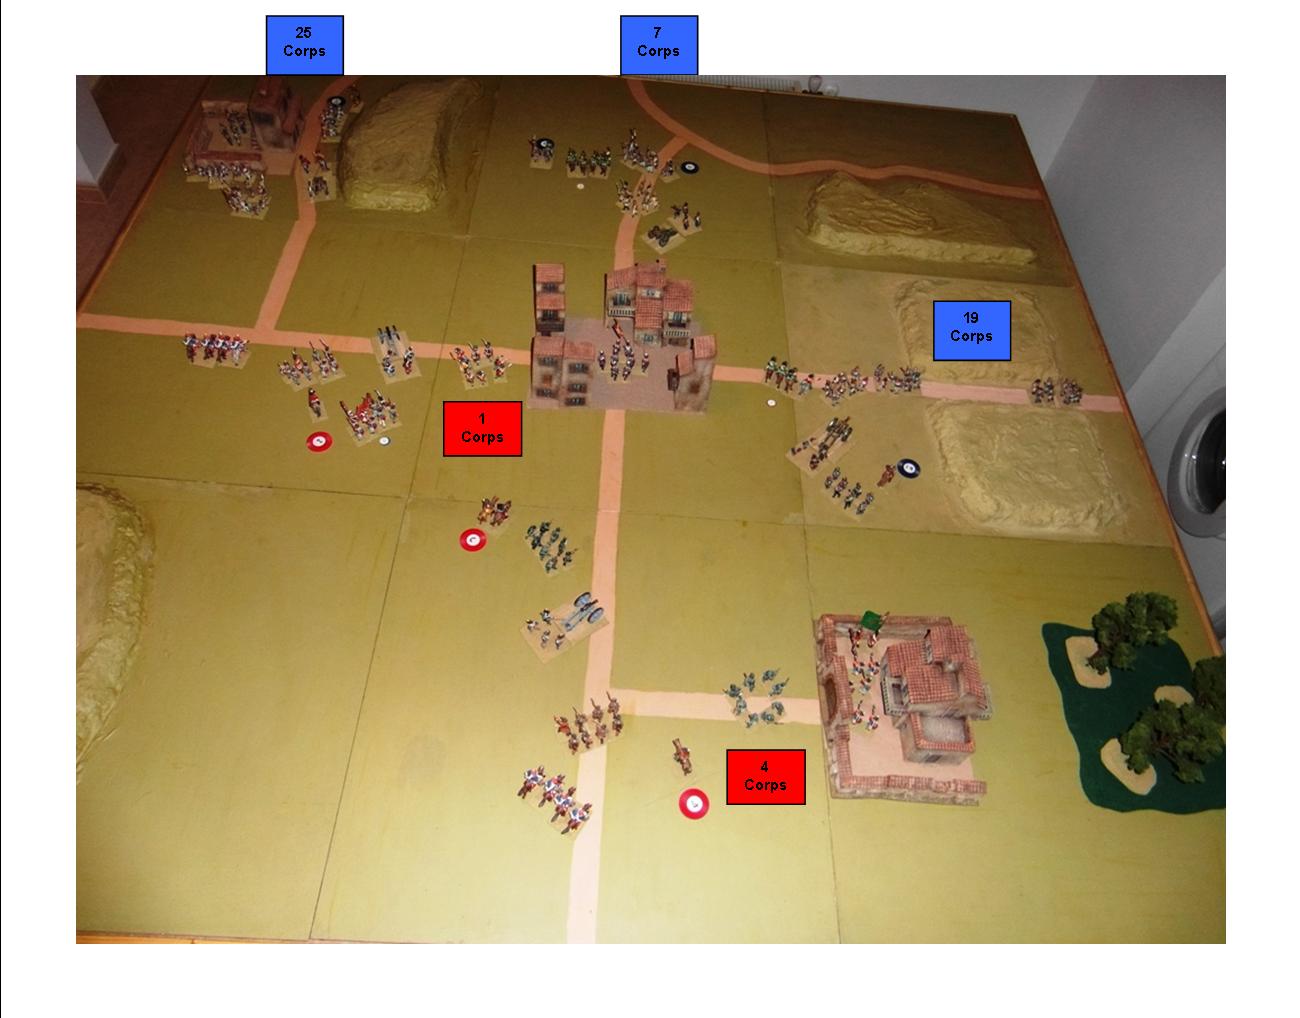
Table at start of wargame
Top left 25th French corps
arrive
Top Centre 7th French corps
in rout
Centre right 19th French
corps will arrive
Centre 1st British advance
to attack 25th corps
Bottom right 4th British
corps will arrive

Move 1 – 0800 to 0900
Top left – British hussars have routed
French dragoons through 25th corps column.
Top centre – 7th French
corps have rallied three of their five routing brigades
Centre right – 19th French
corps start to arrive
Centre – 1st British corps
orders changed from attack to hold
Bottom centre- 4th British
corps start to arrive

Move 2 – 0900 to 1000
Top left -25th French corps
start to sort themselves out
Top centre – 7th French
corps has lost two brigades in rout, but remainder are deploying
Centre right – 19th French
corps advance from pass, cavalry are repulsed by squares
Centre – 1st British corps
withdraw cavalry and deploy to left of town
Bottom right – 4th British
corps halt and form square to meet French cavalry
Move 3 – 1000 to 1100
Top left -25th French corps
start to deploy south of farm
Top centre – 7th French
corps start to deploy, artillery open fire on town
Centre right – 19th French
corps deploy ready to advance
Centre – 1st British corps
deploy to face 7th and 25th French corps
Bottom right – 4th British
corps deploy between town and farm

Move 4 – 1100 to 1200
Top left -25th French corps
artillery open fire on British to left of town
Top centre – 7th French
corps receive orders to attack the town
Centre right – 19th French
corps rally cavalry and advance between town and farm
Centre – 1st British corps
garrison town 6pdr guns out of range of enemy
Bottom right – 4th British
corps garrison farm and extend towards town

Move 5 – 1200 to 1300
Top left -25th French corps
artillery rout two infantry brigades
Top centre – 7th French
corps approach town and exchange skirmish fire
Centre right – 19th French
corps artillery open fire on infantry near farm
Centre – 1st British corps
lose two infantry brigades and cavalry shaken
Bottom right – 4th British
corps send rifle brigade to reinforce town

Move 6 – 1300 to 1400
Top left -25th French corps
advance against broken British left flank
Top centre – 7th French
corps continue to skirmish with garrison
Centre right – 19th French
corps skirmish with town and farm
Centre – 1st British corps
retreat, town garrison shaken
Bottom right – 4th British
corps unable to advance into gap between town and farm

Move 7 – 1400 to 1500
Top left -25th French corps
advance against broken British left flank
Top centre – 7th French
corps storm town and rout garrison
Centre right – 19th French
corps advance between town and farm
Centre – 1st British corps
ordered to halt and hold, Portuguese rout from town
Bottom right – 4th British
corps ordered to halt and hold, rifle brigade sent to hold town

Move 8 – 1500 to 1600
Top left -25th French corps
cavalry routed but infantry continue to advance
Top centre – 7th French
corps fight for the town and infantry rout
Centre right – 19th French
corps lost fight for the farm and infantry rout
Centre – 1st British corps
ordered to retreat
Bottom right – 4th British corps
order rifles to abandon St Jean

Move 9 – 1600 to 1700
Top left -25th French corps
ordered to advance on engage orders
Top centre – 7th French
corps all in rout except for shaken cavalry
Centre right – 19th French
corps second attack on farm routed garrison
Centre – 1st British corps
start to retreat
Bottom right – 4th British corps
ordered to retreat

Cavalry melee
During the very first move of the game
the British hussars charged the French dragoons at the head of 25th
French corps. The hussars roll
2xD6. The dragoons lose 10% and rout
back through the long column, causing huge problems for the French. We were tempted to roll the dice again, but
being a campaign game we felt that would not be right. The only way fair way to fight campaign
games is to accept the extremes of good, and bad, dice.
Game Casualties
French suffer 5600 infantry and 400
cavalry casualties
They also have one cavalry and seven
infantry brigades in rout
British suffer 5200 infantry and 100
cavalry casualties
They also have one cavalry and three infantry
brigades in rout
Game Summary
This was the hardest fought battle of
the campaign so far, and with the highest number of casualties on both sides.
Although the French have suffered more
casualties they have 25th corps intact, except for their cavalry
brigade, who is advancing against the British broken left wing.
7th French corps, who
started the battle in retreat, have suffered heavy casualties and have ceased
to exist as a fighting force. All of
their infantry and gunners are in rout, and their cavalry shaken.
19th French corps have
suffered moderate casualties, but half of their infantry and all their cavalry
are in rout.
Each of the British corps have two
infantry brigades in rout.
However they have managed to break
contact and retreat behind a strong cavalry screen
They have managed to take all of their
artillery with them.
No comments:
Post a Comment