
San Sebastian Campaign Area
Five French
corps have orders to attack San Sebastian
Wellington
is not expecting this attack
His army is
badly positioned, and has the wrong orders, to meet it.
It will take
a little time for him to bring up reinforcements
French 52,000 infantry 4,000 cavalry 120 guns
British 28,000 infantry 3,000 cavalry 90 guns
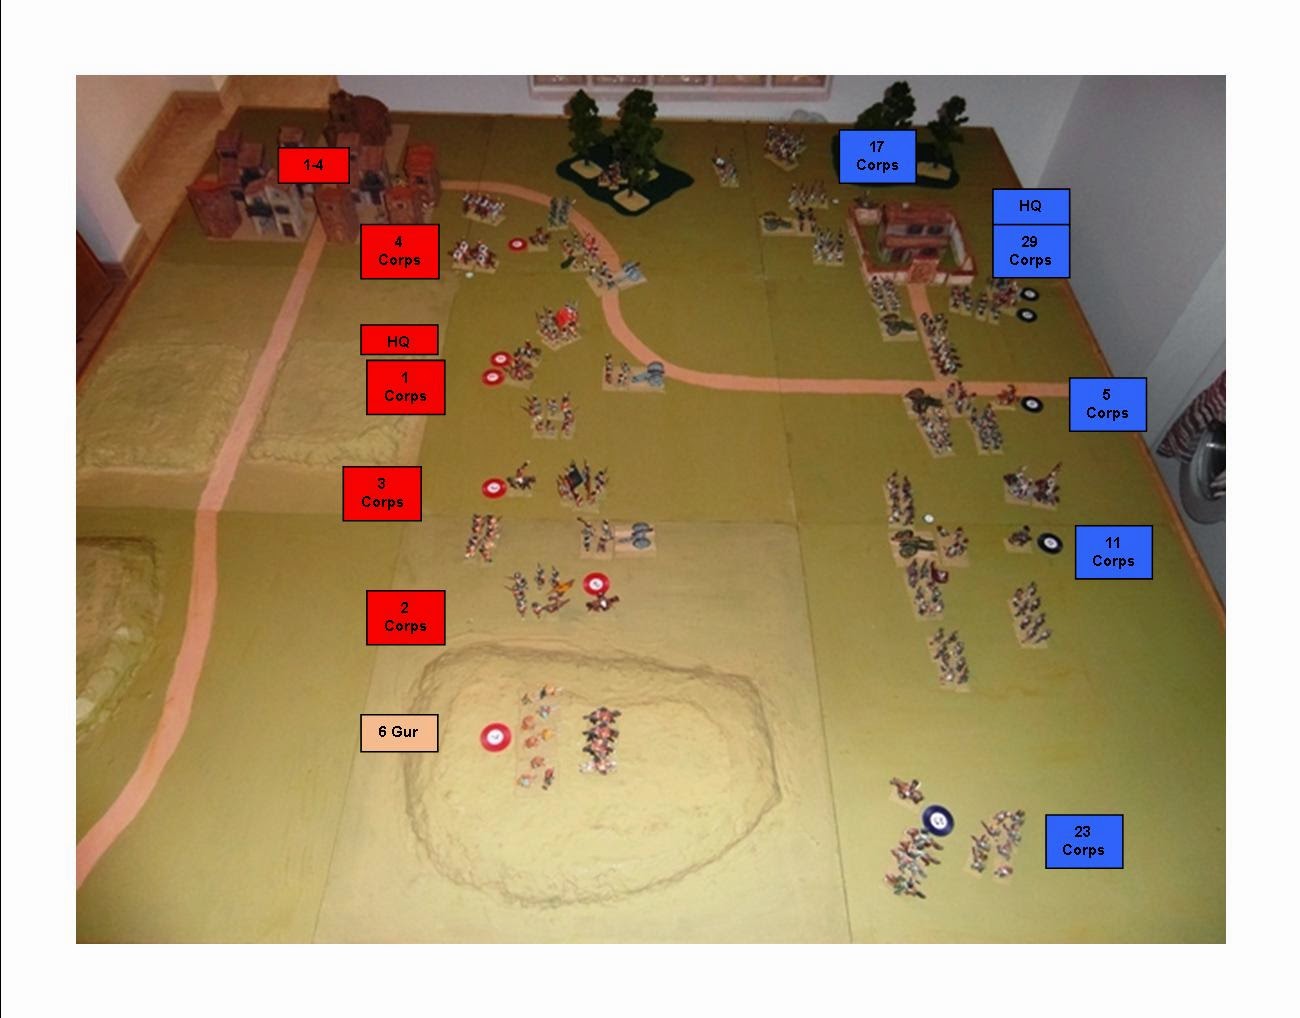
British HQ move E08, E09
1 corps halt on hold
2 corps halt on hold
3 corps move D08 on hold
4 corps move F08, E08 on hold
6 guerrilla move G08, G09
French HQ move G07 with 11 corps
5 corps move G08 on engage
11 corps move G07 on engage
17 corps move G09 on engage
23 corps move H08 on engage
29 corps move H09 on engage

Table at start of wargame
French
Brigades 13 infantry 4 cavalry 4
artillery
British
Brigades 7 infantry 3 cavalry 3 artillery
British HQ on table at start
1 corps arrive F09 move 3
2 corps arrive F07 move 3
3 corps arrive F08 move 1
4 corps on table at start
6 guerrilla on table at start
French HQ on table at start
5 corps arrive H08 move 1
11 corps on table at start
17 corps on table at start
23 corps arrive H07 move 1
29 corps on table at start

Move 1 – 0800 to 0900
Wellington
orders 4th corps to halt and hold
He
sends 6 guerrilla to occupy the hill bottom left
3rd
corps arrives and moves to gap bet ween 4th corps and the hill
French
corps are all on table and moving towards British

Move 2 – 0900 to 1000
British
infantry occupy woods and form square
French
cavalry deploy to pin British
Remainder
continue to advance
Hard
to see how the British can hold such a large force of French

French continue to advance and start
to deploy
1st and 2nd
British corps arrive on table

Move 4 – 1100 to 1200
Both armies continue to deploy

Move 5 – 1200 to 1300
Artillery
on both sides open fire, but no casualties
Soult
orders his army to advance and engage the British

Move 5 – 1200 to 1300
Same
deployment, but table moved to the west to include San Sebastian
Move 6 – 1300 to 1400
French
artillery fire on woods and cavalry
French
infantry skirmish woods
Cacadore
brigade in woods suffer 20% casualties and retreat from edge
Hussar
brigade receive 10% casualties and are shaken
British
artillery fire on infantry, minor casualties all pass morale test

Move 7 – 1400 to 1500
French
advance to attack
French
artillery fire in support, but only minor casualties
British
artillery fire on advancing infantry, again minor casualties

Move 8 – 1500 to 1600
French
and British artillery continue to fire on infantry
4th
British corps infantry rout due to artillery casualties
2nd
British corps cavalry charge and rout French hussars

Move 9 – 1600 to 17000
British artillery rout French infantry
and nearby gunners shaken
Portuguese abandon woods
French continue to advance

Move 10 – 1700 to 1800
(Top)
Portuguese cacadores lose skirmish and rout
(Centre)
French dragoons charge, and rout, gunners.
Two nearby brigades join rout
(Centre) French lancers charge, and
rout, gunners
(Bottom) French chasseurs charge
dragoons and force them to retreat shaken

British Rout
Five infantry brigades and two corps
artillery are in rout in the centre
As the French continue to advance
Wellington orders a general retreat
Game Casualties
French lose 2,800 infantry and 100
cavalry
British lose 5,600 infantry and 100 cavalry plus 60 guns
Game Summary
Wellington was heavily outnumbered and
always likely to lose this battle
He would have needed excellent dice
for his artillery, which he did not get
He was also unlucky with his morale
dice for brigades near to a rout
But the real reason was that the French had too much of everything
The final rout was French cavalry and artillery
combined
The French infantry did not play much
part, but were available if needed
No comments:
Post a Comment